Systems Engineering
Table of Contents
Research:
Idea 1:
This is a design of a Midi Controller using an Arduino, however the faders have a very short travel distance, there are no toggle switches which could be used to turn on ‘Single Track’. There also isn’t any ventilation for cooling in case the Arduino heats up.


Idea 2:
This design has the toggle switches compared to the previous idea along with more travel distance of the faders. However, the design of this idea is more of a cube where as the general DAW (Digital Audio Workstation) Controller is usually in a rectangular cube design. There are also extra knobs compared to faders.
Arduino:
| Mega 2560 | Uno R3 | Nano V3 | |
| Price | $21.24 | $16.97 | $8.33 |
| Analog I/O | 16 | 8 | 8 |
| Digital I/O | 54 | 14 | 14 |
| MIDI over USB? | No | No | No |
The above table shows the comparison of the 3 models of Arduino boards with their price, their available Analog and Digital I/O and if they support MIDI over USB. All 3 boards do not have MIDI over USB however, there are methods to load custom firmware to allow MIDI over USB using the HIDUINO repository found on GitHub. The Mega 2560 has the most Analog I/O and Digital I/O available therefore, I will choose the Mega 2560 as if I chose the other models, I would definitely require a multiplexer (4051) as both slide potentiometers and rotary potentiometers are analog and there would be 8 of each so it would not meet the requirements.
Aluminium:
My initial plan for the CNC Router project involved using a piece of steel. However, after further research, I discovered that steel wouldn’t be compatible with the machine’s capabilities. Undeterred, I continued my investigation and learned that the Router could actually work with aluminum, provided the right cutting bit was used. Unfortunately, the school’s available aluminum sheet stock didn’t meet the specific needs of my project. Determined to find a solution, I reached out to several aluminum wholesale distributors. Luckily, Capral Aluminium recognized the educational value of this project and generously offered their support. They provided a 2mm thick, 1200mm x 2400mm sheet of aluminum that perfectly matched the resistance requirements I needed. This particular sheet is classified as 5005 H34 aluminum, which offers a good balance of workability and strength for my project goals.
Enclosure Design:
Initially, I thought simply cutting six pieces of aluminum would suffice for the enclosure. However, after some trial and error, it became clear that a more sophisticated approach was needed to achieve a truly polished outcome. This realization led me to a website tutorial that offered a potential solution. The tutorial not only provided a specific method, but it also opened the door to further research on alternative approaches. One particularly appealing technique involved incorporating tabs on the edges that could be folded inwards to create the sides of the enclosure. This eliminated the need for multiple pieces for the bottom, simplifying construction and reducing the need for complex seams. By embracing this new approach, I could focus on achieving an aesthetically pleasing final product rather than struggling to find a solution that merely functioned.


Folding Design:
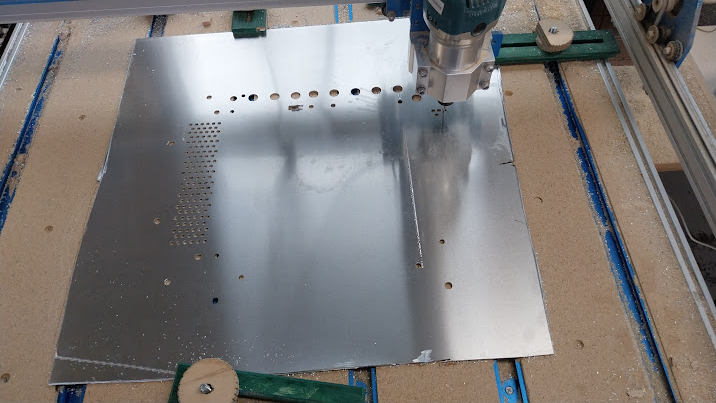
As the enclosure design has bends and folds for assembly, these have been clearly outlined by the dotted lines in the first picture. To ensure clean and precise folding without additional tools, a 1mm deep cut will be engraved along these dotted lines using the CNC Router. This 1mm depth, corresponding to half the sheet’s 2mm thickness, creates a stopping point for the bend. This outrules the risk of tearing or cracking. inthe bend. Following these engraved lines, the flaps and tabs will be carefully bent. These flaps and tabs also feature holes strategically placed for three purposes: screwing them into the side components for secure attachment, inserting pop rivet-nuts and screwing the topp ‘lid’ into the pop rivet-nuts . These pop rivet-nuts will create a threaded insert within the sheet metal, allowing for a strong and reliable screw connection on the opposite side. By strategically bending all the folds inwards, the individual pieces of the enclosure will perfectly align and interlock when brought together, forming a complete and secure net structure. This inward folding approach ensures a clean and flush final assembly.
CNC Router:
The CNC Router available at school is typically used with types of wood such as MDF, Plywood and timber however, the BlueCarve is compatible to route Aluminium given that the correct ‘bit’ is used as mentioned previously. The first bit I tried which was recommended for Aluminium had worked when performing prototype testing (images can be found below in the ‘Prototype’ section) however, when I wanted to try out the second time with an updated design, the bit broke. Luckily, my teacher stated that it’s quite common that router bits break and we got new bits. We had used 2 pairs of 1mm and 2mm wide router bits which were made for Aluminium but they kept breaking instantly. With the support from Adam, the BlueCarve company owner, he mentioned with the use of methylated spirits being sprayed on the sheet while routing, it should be able to work. With this new trick I had learnt, I implemented it straightaway using the 3mm router bit and it worked. Thanks to the learning process, I had come to know it is best to keep the auminium sheet moist while routing!
Special Insipration Section:
As this project is building a system that is a DAW (Digital Audio Workstation) controller through MIDI, there have been many people who have inspired me to reach the position I am in today. I am currently the Front of House Engineer at Keilor Downs College, a Sound Engineer as a hobby providing Mixing & Mastering services and also an Audiophile! Without the support of others, I would have no clue about any of this technology (in terms of Audio), so therefore, I have decided to have an inspiration section on the bottom of the DAW Controller’s Enclosure to ‘Thank’ and show that I care for them and what they have done for me with their name in the case I meet them one day, I can get it autographed as a memorabilia. Some of these people are just artists who are celebrities, but as they inspire me I decided to include them in this section. I will be engraving their names using the CNC Router (with a 0.8mm depth) and painting the names with black paint to ensure the names are visible on the shiny colour of the Aluminium. I originally had planned to have pictures of these people engraved however, due to the complexity of engraving faces along with the CNC Router’s capability, I have changed it to only the names of the people and a picture of my favourite artist – Anirudh Ravichander.
Some of these people include:
- Shadab Rayeen – Brought me to the Sound Engineering World through the clip of him Mixing & Mastering the song ‘ La La Bheemla’ from the film Bheemla Nayak
- Sunny MR – Along with Shadab Rayeen, Sunny MR brought me to the world of Sound Engineering along with Studio Production
- Aditya Modi – Brought me into the world of Live Monitoring
Design Process

")


3D Modelling:
The below model is the design I have finalised with as it is in the design structure of the SSL UF8, has 8 faders as per the requirements, the toggle switches have ON-OFF-ON mode, the knobs are assigned to each of the fader channel and it also includes a passive mixer with 8 1/4 inputs on the back connected to the faders, with has a 1/4 output and a headphone jack for monitoring.


Sketching:
Circuit Attempt:
I have created a circuit design using the software Fritzing. This design consists of the Arduino Mega2560, 8 Slide Potentiometes which will be used as ‘Faders’ in the DAW, 8 Rotary Potentiometers which will be used as the ‘Pan Knobs’ in the DAW and 8 Toggle Switches which will be used for the ‘Solo’ function in the DAW. There will also be 8 Input 6.5mm Jacks with 1 6.5mm Jack Output and 1 3.5mm Jack output for the passive mixer element. These jacks will be connected to the Slide Potentiometers with 10K Ω resistors. The Arduino supports power through USB however, as the components being used in this system require high powr (5V), the finished system will use the Arduino’s external power-supply feature to ensure the required amount of power flows through the system. Though the 5V and Ground (GND) signal are all daisy chained through one of the Slide Potentioemeters, they will be all going through a breadboard for the finished system to ensure that there is no point of failure. As both types of Potentiometers are considered ‘Analog’ componenets, the Rotary Potentiometers will be connected from ports A0 to A7 whereas the Slide Potentiometers will be connected from A8 to A15. However, on the other-hand, the Toggle Switches are considered ‘Digital’ as they only output 1s and 0s, they will be connected to the dgital ports of the system. Unfortunately, I as not able to design the circuit wiring of the Passive Mixer as, 1 I was unable to find the correct parts in Frtizing, and two the wiring design is still unfamiliar to me.

Prototype:
Originally, I designed a brief prototype using cardboard and making holes where the components will be placed, however, it came to my attention that it would be considered prototyping when I am testing the aluminium sheet with the CNC Router. During this process, many router bits were broken but in the end I had learnt the right way to overcome this issue!